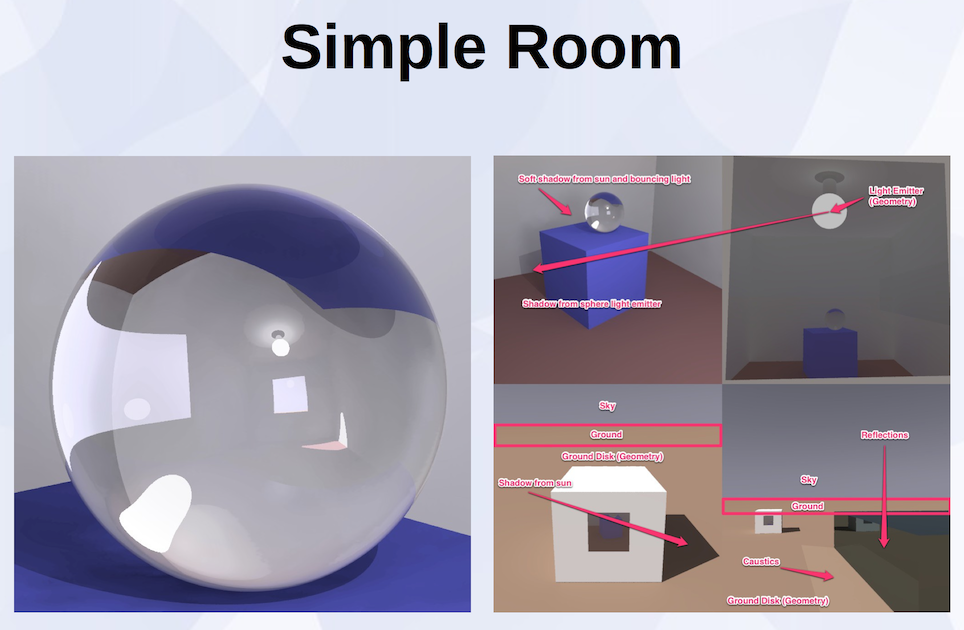
The first and probably simplest scene for a global illumination renderer comparsion comes from the Radiance renderer and chapter 1.3 of the Rendering with Radiance book.
It has only two light sources, a light emitting sphere inside a simple room (a box with an opening for a window), and a sun and sky simulation outside.
In the original tutorial the camera looks at a blue box with a crystal sphere on it, you can see parts of the room - the brown floor, and two of the grey walls.
The image above shows on the left side a close-up of the crystal sphere and you see the light emitting sphere being reflected in it. You can also identify a bright spot on the floor and parts of one wall, which originates from the sun shining through the (glass) window.
On the right side you see four different camera positions:
-
The original camera perspective with shadows being cast against the wall (and the floor). Hard shadows from the light emitting sphere, soft shadows from the sun and sky (and bouncing light).
-
A view just outside the room, looking through the window into the room, showing the light emitting sphere being mounted to the ceiling by a metal cylinder.
-
A camera perspective which shows the horizon where a virtual sky meets a virtual ground (provided by the same sun and sky simulation). Some ground geometry (in this case a disk) fades into the virtual ground simulation. The simple room casts a shadow onto the ground geometry. Through the window we see some parts of the inside of the room.
-
An overview over all elements in the scene. The room, a ground disk, an outside, reflective building, the virtual sky and ground, shadows and caustics. The caustics bundle light rays which hit the same location on the ground disk, once directly, once reflected by the building.
Even though this scene is extremly simple regarding the choosen geometry and has only two light sources it wouldn’t be easy to create a movie with an animated camera travelling through this four key positions.
Most renderers provide a sky simulation, some of them include the ground, some don’t. The intensity of the sun is much higher than the inside light emitter, so that you would have to adjust the exposure, while moving the camera, to get a sequence of images which are not over- or underexposed.
Other things you can learn from the scene:
-
Does the renderer in question support primitives - like spheres and cylinders?
-
How can we archieve the seemless blend between the ground simulation (being part of the sun & sky simulation) and the ground color as a result of real geometry being lit by e.g. a directional light source (like the sun contribution of the sun & sky simulation).
-
Is the sun and the sky part of a single shader or should both be separately adjustable?
-
How does the renderer deal with caustics? Beside the reflective caustics we saw on the ground, created by the reflective building, there should be a concentration of light visible on the top of the blue box, under the crystal sphere. Those caustics are created by the index of refraction of the crystal glass material and refracted light rays coming from the light emitting sphere inside the room.
